In this installment, part 2 of the Blasted Planet series of posts, I’ll be covering the flickering magma lighting effects that will emanate from the magma tube. The effect has a few great uses: inside flaming wreck models, the flickering eyes of a daemon engine, anywhere you want to give the impression of a raging fiery heat source.
You can see Part 1 here.
The circuit described in this article is designed to be simple but still get the job done with a minimum of required parts. You should need only novice soldering skills.
If you would like to learn more about soldering here is a fairly comprehensive webpage on the subject.
REMEMBER: Safety first, last and always! Wear safety glasses while building this project!
How To…
I’m sure most of you have seen the flameless flickering LED candles that are sold in many of your local stores. For the purposes of this article, we are interested in the 99¢ store variety, i.e. super cheap. I suggest picking up at least two of these flameless candles in case one gets broken during the disassembly phase.These candles can be used as-is for these effects, but they are not very bright. The purpose of the this article is to outline instructions for making a small light board that can be seen under fairly bright game store, tournament, or home lighting. You shouldn’t need to dim the lights to see the flickering of the flames!
Materials
- LED Flameless candle (one that doesn’t have a resistor inside)
- Channel locks
- Slotted screwdriver
- Soldering iron
- Solder
- Solder Wick (not absolutely necessary, but good to have if you make a mistake)
- Proto board
- 330Ω 1/4 Watt resistor
- 9V battery snap
- 9V battery
- 3 Sunburst style Yellow LEDs
- 4 Standard Red LEDs
- A small ball of green stuff

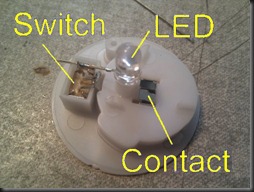
At this point the LED, the battery contacts, and the on/off switch are clearly visible. We want the LED and the switch.

Either clip or unsolder the LED from the battery contact and the switch. Be careful, this LED is the most important one. Keep the leads that stick out of the bottom of the LED as long as possible.
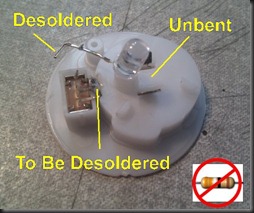
In the picture below the LED lead has been desoldered from the switch and the battery contact has been bent so that the other LED lead can be easily freed (it was not actually soldered to the battery contact).
The switch will also need to be desoldered from the other battery contact. This step still needs to be done in the picture below.

Now that you have the case open, look at components attached to the LED. If you see a resistor attached (inset above) this LED won’t work with the schematic below. A candle with a resistor inside is not a common thing anymore so you should have no problem finding what you need.
When you have it out, examine this LED closely. You should see a lip around the bottom of the LED, close to the leads. This lip should have a flat spot on it. This flat spot tells you which lead is the more negative terminal… meaning it ends up closest to the negative terminal of the battery. Because an LED acts like a one way valve, if you put it in backwards, your circuit won’t work. Sort of like when you put a battery in backwards in a device.
The Schematic
The circuit below is a schematic of the final assembly.
S1 is the switch. It is listed as a Single Pole Single Throw switch, but feel free to use the switch you got from the candle, whatever it’s configuration. You can skip the switch entirely and just turn the thing on and off by connecting/disconnecting the battery. If you leave the switch out, just make sure you complete the circuit by soldering the Red battery lead to the junction of R1 and D4.

BT1 is the 9V battery and it’s snap. Try to find a battery snap with at least 8” of leads included. I got mine from an old metronome I had. The leads are listed “Positive (Red)” and “Negative (Black)” to keep you oriented properly.

R1 is the resistor. If you are not experienced in electronics, the easiest way to get your hands on one of these is to hop down to RadioShack and ask the person behind the counter for a “330 Ohm resistor at 1/4 watt.” Shouldn’t cost more than $0.50 US. This resistor limits the current to the Red LEDs. It is critical that this resistor be installed on the Red LED branch or you’ll end up blowing an LED.

LED stands for Light Emitting Diode. Take a minute to study the LED symbols and graphics in the picture below. The large arrow (pointing right on the schematic symbol at the bottom) indicates the flow of electricity (positive to negative) and the vertical bar indicates the flat spot on the LED. The two little arrows are what tell you this diode is light emitting. Without those two little arrows, it’s just a humble diode.

D1 is the Flicker LED from the candle. This LED is really cool! It has an on-board resistor to limit the current and all the circuitry necessary to make the LED (as well as whatever is connected to it on it’s branch) flicker. This LED drives the rest of the Yellow LEDs! It doesn’t matter where you put this LED on the yellow branch because it randomly cuts power for the entire branch it is installed on. But, just to keep things easy to follow, solder your board as closely to the schematic as possible.
Also, don’t put multiple flicker LEDs on the same circuit because it is very likely that they will interfere with each other and nothing will work.

D2-D4 are Yellow LEDs. I used Linrose part numbers B4308CH7 and B4304H93. If you can, try to find “Sunburst” LEDs. The B4308CH7 is the Sunburst style and is very bright but the store only had two in stock so I had to get a couple of the other “Ultra-bright” style LEDs. Which are less bright, unfortunately.

D5-D8 are standard Red LEDs. They don’t have to be bright or flicker as their purpose is just to provide an angry background glow.

Final Product
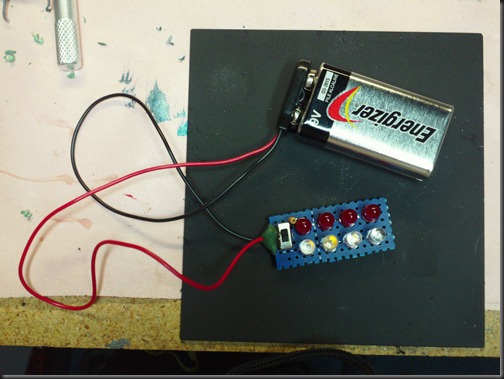
My final product looks like this:
The blue board with the holes is the proto board. If you compare that to the schematic, you’ll see that it is laid out basically the same.
The back of the board (below) is not my best work.

Seeing as this is the back of the board everything is flipped. The Red branch is now on the bottom and the Yellow on the top.
From here, you can trace the circuit around the board by following the silver metal (the solder). The Red battery lead connects to the switch (far left) under the green stuff. The circuit then branches, top and bottom, then goes through the components and then both branches come back together at the Black battery lead (far right).
As you can see, I’m using green stuff as strain relief for the battery leads. Works really good and will keep the solder and wire from fatiguing and breaking when you bend the battery leads!
In the video below you can see it in operation under my workbench lamp. You can see the light is easily visible bouncing of the walls of the magma tube even though the room is well lit.
When the dry ice fog vessel is installed and working the fog will act like a diffuser and make the light a lot more visible in a brightly lit room. The fog will essentially give the light something to bounce off of. Without the fog, 90% of the light just shoots straight at the ceiling and never really gets seen.
In the video I tried to diffuse the light with some frosted glass, but that didn’t work too well. The fog will work much better.
The next installment of Blasted Planet will cover a simple dry ice vessel to simulate the noxious vapors of Furianis, that’s what I've decided to call the Blasted Planet, as well as propose some simple rules to make a game held near volcanic terrain a bit more interesting.
Disclaimer
Keep in mind that clipped leads are sharp and solder melts at about 600°F so great care must be taken while building this project. Safety glasses are REQUIRED, only an idiot would not use them. If you are a minor, make sure your parents supervise.Neither the author nor Green Stuff Industries takes any responsibility for injuries sustained while attempting this project. This is a “build at your own risk” project.
To order a Tentacle Maker, please click this link Order the Tentacle Maker or click the Order the Tentacle Maker entry in the Pages box at the top right. Only $15.95 + tax and shipping!

Interesting post, though it`s all Greek to me, but then, I`m thick as two short planks.
ReplyDeleteI tried to make it so people wouldn't need a lot of electronics experience to build the thing... it's hard to know what needs detailed explaining and what doesn't. Was there anything in there that you specifically thought needed more coverage?
DeleteThanks for reading it, BTW! Rich