 |
| John Post-game. |
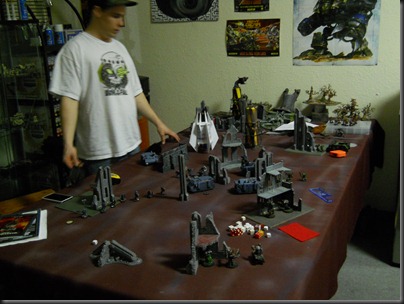
I’ve been struggling with my CSM army since the beginning of March. My record until last night was 0-1-8. Now, after 9 games of horrible rolling and stupid mistakes, I eked out A FREAKIN’ WIN last night against John and his Wolf Guard over at Frontline. Unfortunately, not having a sunny outlook about the game caused me not to take any pictures until the end. So, this will be a wordy battle report of sorts, I’m afraid.
Pre Game
Let me say up front that John did help me talk through some of the rules and tactics (like multi-assault, I knew I wanted to do it but wasn’t sure how to do it legally), so I didn’t do it completely on my own. The overall plan was all mine though!John’s Wolves
(I don’t know his codex at all so some of this is likely wrong)3x5 Longfangs with ML
4x5 Troops with dedicated Rhinos, Melta, seargent with power fist
2x Rune Priests, 1 Lightning power and 1 (Wolfen?) power
1x6 scouts, seargent with power fist
And another type of unit that can split off/up and be sergeants for the troops.
My CSM Army
Dreadclaw, carrying both Lords and the ZerkersI had decided after my last match against Kyle (a tie only because he lost focus and teleported troops off one of two objectives he clearly held in order to clear me from the only one of three that I held) that his Necrons with a crazy amount of power weapon attacks looked fun and effective and I should try to come up with a combo of units that could do just that.
2x Chaos Lord with power weapons and MoK (12 power weapon attacks on the charge!)
8x Berzerkers
2x3 Oblits
1x7 Plague Marines, 2x meltas, champ with power fist, Rhino
1x8 Plague Marines, 2x meltas, champ with power fist, Rhino
I’ve also come to the conclusion recently that CSM lacks mobility, big time. I liked Kyle's teleportation ability and Kino’s Death Company fast attack armor so that’s why I’m building the Dreadclaw, which I used last night to great effect.
We played the Bay Area Open scenario using Dawn of War deployment and 1500 point lists. I’m really liking the BAO scenario because it seems to allow less up to date armies more of a chance at a win. There’s more tactical Kung-Fu involved, which I really like.
John won first turn. I was unable to seize.
Command Posts (CP): his was deployed near the center of the board behind a large circular ruin. Mine was on my extreme right, in the corner inside another ruin.
Capture and Control Objectives (CCO): I placed mine in the open as close to the center as I could (basically on the opposite side of the ruin from his CP) but still 12” from his CP and the other in the open far left corner of his deployment zone. His was placed middle left, in the open.
Initial Deployment: He placed a rhino and one HQ with supporting troops inside right on his CP. I place a Rhino full of Plaguers behind the ruin my CP was in.
Turn 1
At this point we both hold our own CPs and no CCOs and there are no Kill Points scored.
Not much happened except getting on the board. He had to walk his Long Fangs on so no shooting from them. He placed them all line abreast in the back right corner, very close to each other. His Rhinos drove up the middle to link up with his HQ Rhino.
I walked my Oblits on but totally missed all my shots on his charging Rhinos. My second Rhino pulled up in support of my Oblits and within cruising speed range of the center CCO that I placed.
Turn 2
At this point we both hold our own CPs and no CCOs and there are no Kill Points scored.
He moved his Rhinos straight down the middle. His scouts came on this turn right behind both of my units of Oblits and my center Rhino (Oh, Snapple!). His Long Fangs took some Krak missile shots on my Oblits but I saved vs all the wounds. One of his HQs vaporized one of my Oblits with a psyker power (make an initiative check or die). His scouts then ‘sploded my center Rhino with a Melta shot. No wounds on the passengers but one on his scouts.
 |
| WIP Dreadclaw that won me the game! |
My Dreadclaw came on (just when I needed it to!) and landed EXACTLY ON TARGET! The table was pretty dense with terrain so I got really lucky on this Deep Strike. My super-choppy troops and HQs were less than 6 inches from two of his Long Fang squads. I moved my Oblits deeper into cover and kept my remaining right side Rhino in cover. The Oblits shot and missed again. The plague marines pistol’ed 2 scouts to death and killed the rest of the squad in close combat.
My supper choppy unit multi-assaulted 2 squads of his Long Fangs (I won combat 8 wounds to 0 but John rolled snake eyes for one of his leadership checks) breaking one and sending it off the board and severely crippling the other. This kept me in combat and safe from shooting for his turn 3.
Turn 3
At this point we both hold our own CPs and no CCOs. I lead in KP 2:1.
John next started to break up his Rhino parking lot in the center in an effort to capture some of the CCOs. Two Rhinos went for the CCO in his left corner and another went for the the one center-left. For some reason he took his Rhino/troops off of his CP and went for the center CCO I was looking to grab. During the shooting phase he managed to wreck my other Rhino with some kind of lightning storm and also managed to immobilize the Dreadclaw with his remaining unoccupied Long Fangs. His 2nd Long Fang squad lost the close combat to my Zerkers and HQs.
I moved my center Plaguers closer to the center CCO. My other Plaguers cowered behind the wrecked Rhino with one guy out in the open to keep my CP controlled. My Oblits whiffed again causing no significant damage. But my Zerker unit with the HQs annihilated his last Long Fang unit and consolidated 6” back toward the center of the board and his CP. I think this consolidation is what caused him to break up his Rhinos even further.
Turn 4
At this point I hold my CP and he holds no objectives at all. I lead in KP 4:2.
His far left Rhino makes it to the farthest CCO and drops off his troops, thus capturing the left corner CCO. The second Rhino of that pair turns around to bring some troops into bolter range on the Zerkers. One squad disembarks and hoofs it toward his CP. That now empty Rhino heads for the same center CCO that my Plaguers are headed for. His final Rhino, the one that was headed for my CP makes a right turn and also heads for the center CCO. He causes no wounds/kills that round.
I move my Zerkers to within 9” of his CP but also close enough to one of his Rhinos that the troops can disembark and shoot/assault me next turn. My center Plaguers move/run onto the center CCO, capturing it. My right Plaguers move out of cover and surround my CP to keep him at least 3” away. My Oblits fail utterly to cause any significant damage, again.
 |
| FAIL! FAIL! FAIL!!!! |
Turn 5
At this point I hold my CP and 1 CCO. John holds 1 CCO (and is 0.5” short of holding his CP again). I lead in KP 4:2.
He disembarks his troops from the Rhino near my Zerkers. Moves the other two Rhinos as close to the center CCO as possible, could be within 3” of that CCO, and uses his 4th Rhino to shield the troops on the CCO he has just captured from my Oblits. He fires some storm bolter shots at my center Plaguers but does no damage. The psyker initiative power evaporates 3 Plaguers from my CP squad. His freshly disembarked squad does 6 kills on my Zerkers, leaving the two HQs and 2 squadmates. He also uses a psyker hurricane on my Zerkers which causes them to take both difficult and dangerous terrain tests when they move.
I don’t move anyone as I see no advantage to it. I do attempt to kill his 2 central Rhinos but fail again! At this point I’ll win if the game ends this turn because I have the lead in both captured objectives and KP. But, I can’t count on that game ending roll. I have to try and do as much damage with the Zerkers and the HQs as possible before they die, in case the game doesn’t end. I move my Zerkers to assault the nearby squad, take no wounds from dangerous terrain, and do some serious hurtin’. All that is left is a single troop and a sergeant with a power fist. His final soldier does nothing but his sergeant makes killing blows with a power fist against both of my HQs. John can tie the game by killing these two HQ’s but I make BOTH OF MY INVULNERABLE SAVES! Rolled 5 and 6, Baby!
Seeing as my turn is now over and I went second, I roll the continuation die and roll a ONE! THE GAME ENDS! I FINALLY WIN A GAME!
Post Game
Had John been able to recapture his CP (short by 0.5”) and the central CCO I placed (short by 0.25”) he might have won the game on turn 5. If the game went to 6 I’m pretty sure he would have crushed me under weight of numbers. Most of his troops (3 Squads!) were still untouched. Every squad I had left was damaged except for one squad of Oblits.
Unfortunately, winning the game got me all addle-brained and I left my AOBR rulebook somewhere. Hopefully, John picked it up by mistake and I’ll get it back next week. If I don’t get it back, no big deal. 6th should be hitting the shelves shortly!
BTW, John was an excellent opponent. He helped me with the fiddly bits of the rules and was very patient when I wanted to look things up (so I could learn it) rather than just ask some one. He pulled no punches but was objective enough to explain stuff without bias. If you are a noob, challenge John and I garuntee you'll learn the game.
 |
| Keno looking stoned and ready to perform an exam. |
The Dreadclaw with the Power Weapon Deathstar worked out really well. I think what won the game for me was the Dreadclaw coming in so early and landing right on target. It would have been nice if the Oblits did any damage at all, but hey, I can’t complain about the result. And, for once the dice were on my side!

No comments:
Post a Comment