
by Strigis Nox
Strigis Nox sent me some photos of his crazy Helbrute kitbash and I asked if he would please-please-please write up how he did the amazing immersion tank effect for the occupant. Here is how he did it...
<<< >>>
Hello, All! Strigis Nox, here. What follows is the very simple process I used to add the tanks to my Helbrute kitbash.
Tools I used:
- Tentacle Maker Tool Box
- snap razor
- green stuff
- white glue
- various paints
- Pour-On table varnish (pictured)

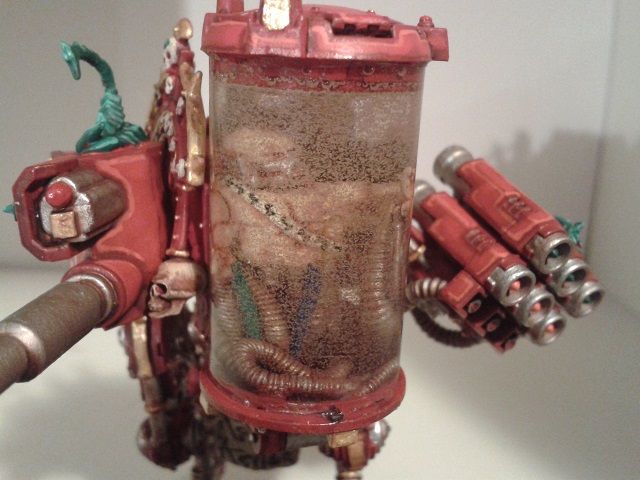
Step 1: Collect pieces – I knew I wanted the pilots of the Helbrutes to be very visible and the dreads themselves to have a really rough feel to their construction to fit with the imposed history of the list I’m working with. To that end I needed a muscly body and a suitable head, I chose a Catachan body with the respirator head from the Chaos Tank accessory sprue.
Step 2: Construction - Once he was glued together I began hacking away at him until I felt he was sufficiently damaged enough to begin adding tubes. I took a pair of Rhino hatches and glued him to a short length of guitar string to get his height set from the bottom of the container, from there I went to work with the tentacle maker and fabricated a bunch of different patterned tubes connected to different parts of him to complete the life support aesthetic I was aiming for.
Step 3: Tube Fitting – I looked for a long time for a good sized tube to put him in and finally found a semi-bendable plastic tube for holding cooking spices (pictured) I simply measured up from the bottom and cut myself a 2” section from the tube. I knew I didn’t need the full 2” but it’s better to have more the first time than less. After rough cutting the tube, it was slid down over the pilot as a dry-fitting to mark the top height required; trim the top of the tube off and then a second dry fit was done with both hatches in place to view the final assembly. Once I was satisfied with this the tube got put in a safe place for a bit.

Step 4: Painting – The pilot was primed and fully painted, the outsides of the hatches were not this time as on my first attempt with this there was a pretty terrible failure (pictured). The material I used for the water effect the first time reacted poorly and bubbled out, ruining the top hatches, tube and pilot. In case a similar failure happened this time I was intent on not doing any more painting than I had to.
Step 5: Tube Attached! – This one is pretty self-explanatory, once the pilot was painted I spread a thin but solid line of white glue around the bottom of the lower hatch and slid the tube into place. It’s important to use a glue that dries clear, I didn’t want to chance it with superglue as it will most likely frost the plastic. White glue takes a bit longer but will yield the better result in the end.
Step 6: Fill the Tube – This is by far the most nerve wracking step of them all as you’ve nicely sculpted and assembled your model then taken the time to paint it knowing all the while that if you’re not careful here all the time is gone as this step will ruin the entire model if not done carefully as evidenced by my initial failure shown above. For the second time around I used Pour-On table varnish, it’s an old staple for clear water effects and while slow to set is a very stable product that cures clear and hard as a rock. Being careful to keep the pilot level I mixed more pour on than I needed to fill the tube and, after ensuring it was properly mixed, did an assisted pour into the tube itself.

An assisted pour in my own terms is when you have a container (in this case an applesauce cup) with material in it and instead of free-pouring it into the destination container you put a thin stick vertically at your pour spout for the liquid to run down into your container. The sticks I use most are old paint brushes but really any thin rigid stick will work so long as it’s long enough to be held above where the material will fall and deliver said material to your destination container.
Once the tube was almost full I placed the top hatch on and left the entire assembly in the pour cradle I had constructed out of a paper cup and a few lines of duct tape to make sure it wouldn’t tip over while curing.
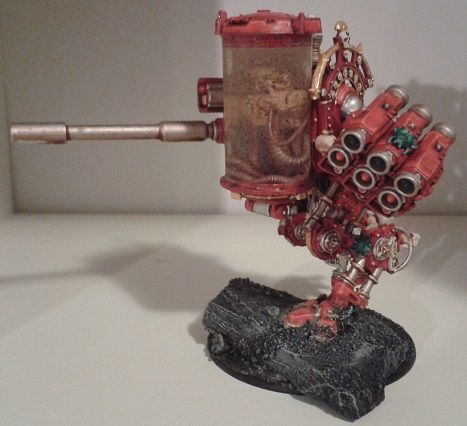
The next day when I came back it was cured enough to handle and within another day it was hard as a rock, it had gotten a bit cooler than I would have liked and as a result there are some micro-bubbles in the final “liquid” but if you cure in a 70-80 degree area it should help keep the micro-bubbles to a minimum. After the tube was cured, I painted the top and bottom hatches then glued the entire assembly into place on the Helbrute.
<<< >>>
Great imaginative work with this one. This is a perfect example of a simple process that can really punch up a model and make it smack the viewer in the retinas. And, thanks for passing on your powerful and arcane knowledge, Strigis!

No problem Rich! Keep your inbox peeled for the quick ammo feed lines tutorial coming soon!
ReplyDeleteWe await any wisdom you choose to impart, sir. Seriously, that's a damned cool effect!
DeleteWow....The most impressive part of this tutorial is the fact of having to pour all that stuff over your lovely painted model. Talk about guts!
ReplyDeleteYeah, pretty ballsy. I did something like this about a year ago but totally botched it. See "Nurgle Soup Fail" linked below. I should have went with the completely clear container and spent a bit more time figuring out the level of tint I needed. I rushed it because I was anxious to get it done. 90% of my modeling mistakes are because I try to rush stuff.
Deletehttp://greenstuffindustries.blogspot.com/2013/04/nurgle-soup-fail.html