

by Novus
I know the overall meta for Dropzone Commander generally eschews the use of Fast Movers (FMs) in tournament play, but I think an FM, or two, can be essential to winning.
On Randomness
The thinking behind not using FMs is based on the feeling that they are "too random." You have to roll to bring them in from reserves and then, once you do that, you have to roll to see if they are available (the Readiness roll) each time you want to activate them.

Even if they are in readiness on the first turn (you luckily rolled that 6!), best case is you have to make a 2+ for each of your next 6 activation rolls. With that much rolling you're bound to fail a roll at some point (unless you have a Forward Air Controller in play at the right place and time). That failure happening at a critical juncture in the game will sting more than most other roll failures. That will stick in your mind.
But, as Chris Loomis wisely pointed out in the comments section of my post Emulating Shaltari Shenanigans,...
My Caiman missed it's turret's shot 3 turns in a row (it has 3 shots, so 9 dice needing 4's b/c of penalty). Must be too random, bench time! /sarcasm
... meaning that every unit is random to some extent. A bad run of rolling can lead a player to believe that a good unit is crap, rather than the rolling being crap. I've personally had my Athena not show until turn 5 because of horrible rolling. And predictably, I benched her for probably 10 games. But, I think the value of this unit, and other FMs, far outweighs the perceived randomness.
Early Game
That said, never take an FM expecting it to do a specific job, like Shaltari gate hunting. FMs are opportunistic, surgical options that in the correct circumstances can win the game. More vulture than falcon. Expecting them, forcing them, to do things like hunt gates will just get them shot down that much sooner.
Unless a better target presents itself, the first two turns my Athena is available I use it for low risk building demo. Why? Because it's really good at it. An excellent streak of rolling can do 16DP to a building in two activations, that's 8DP on just average rolls. That's Taranis or Enyo good!
I've dropped a 30DP building in 5 consecutive activations over 2 turns using only a Hades, a pair of Taranis, and my Athena. The Taranis and Athena fired twice, each.
Low risk? Yes, very low. Here's what you need to remember: the two Stealth Cruise Missiles the Athena carries have a Front firing arc, an infinite range, and you always hit buildings on a 2+ (p27 MRB 1.1)! Therefore, you can bring her in on one of your corners (making sure the target building is in her Front arc at the chosen firing point along the flight path), travel whatever minimum distance she needs to fire, and then exit the board ASAFP. There are very few buildings on the board she can't hit via a short run across your deployment corner(s).

She can also Super Cruise, which won't effect her hitting the building (buildings always get hit on a 2+!) and helps keep intercepting FMs from shooting her down. Further, if your AA bubble covers the corner she is passing over, your AA can shoot at any interceptor that tries to engage her.
Here's how you do low risk demo...
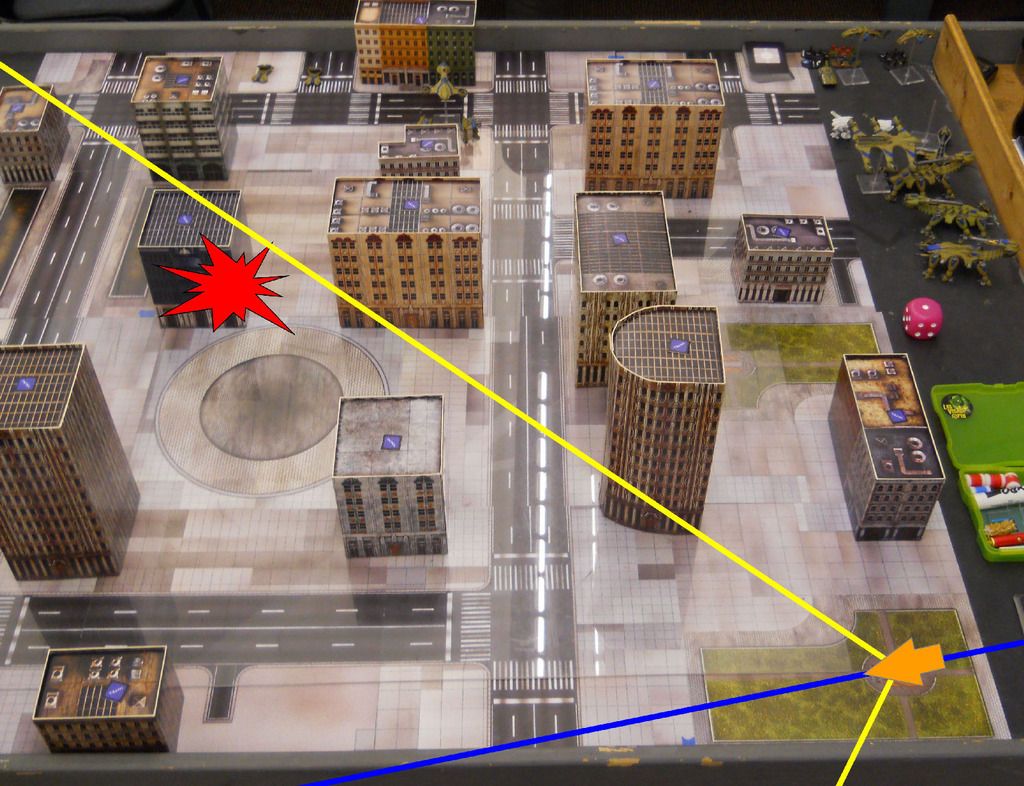
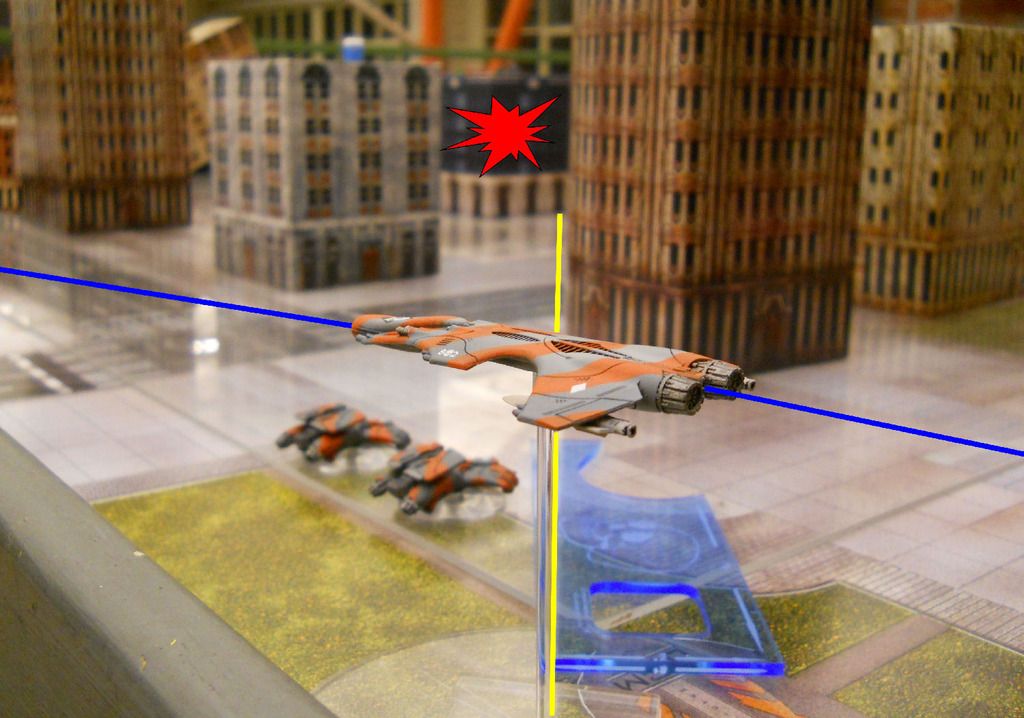
Your deployment edge is at the bottom of the photo above. Pick your target building (red explosion) and plan your flight path (blue line) so that the structure is in your front arc (yellow lines) when you reach your firing point (orange arrow). Spend the minimum amount of time on the map possible. As you can see, it could have also hit the small building behind the building that was targeted (have to check that LOS, though).
If it can stay in your AA bubble (pink arc), all the better. This helps shield it from interceptors.
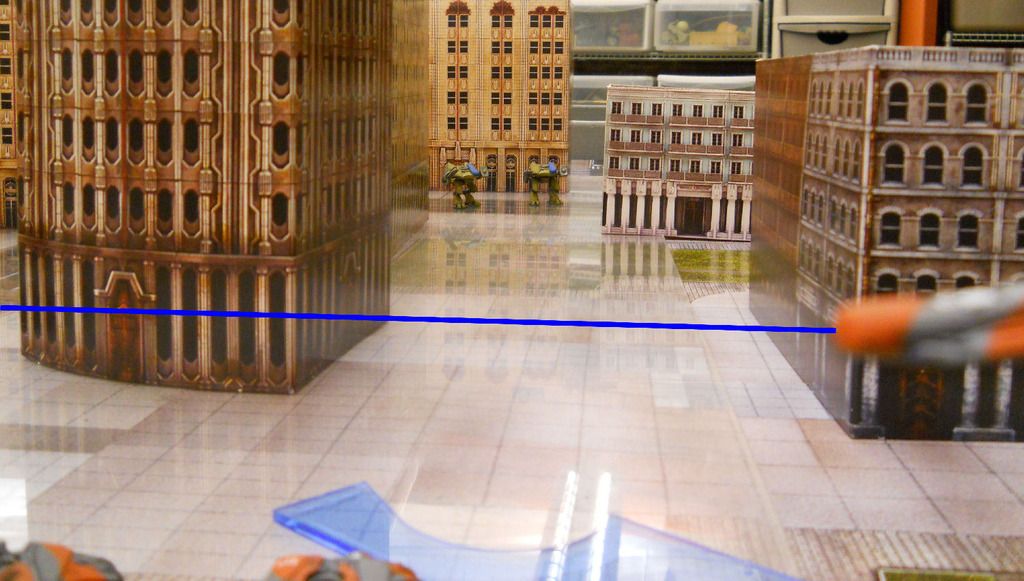
Using the full front arc also means that it doesn't have to tangle with enemy AA, like those Phobos lurking in the background above. If the cruise missiles were Narrow arc, the Athena would likely have had to enter their AA bubble at some point along its run.
Mid to Late Game
When the cruise missiles are gone (they are limited to just 2, after all) I can then use the standard Stealth missiles (also front arc) to continue the demo mission or use the Athena to hunt stray air transports or light ground vehicles or just hold it in reserve as a threat to enemy FMs.
For mid game I think Hunting strays is important because if you tie, Kill Points are going to break that tie.
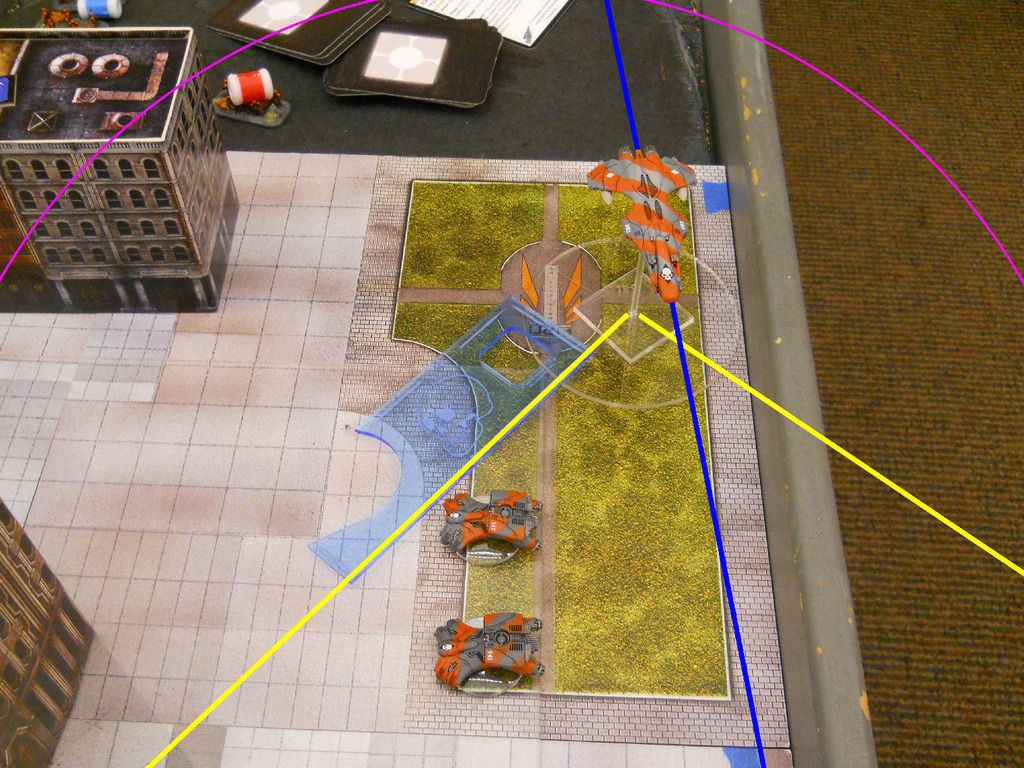
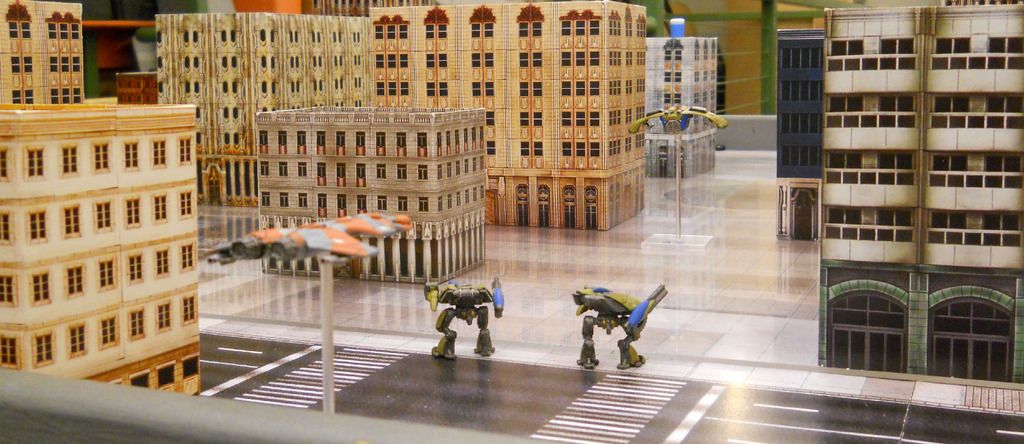
The last game I played I destroyed the same Triton twice (he played a Call for Extraction card), stranding its troops in a building for half the game. The first kill was with some Helios (which died much too quickly to a Hades) but the second was in a scenario similar to the one pictured below. Three Phobos and two Helios covering a Triton (like the one in the background). But all of the Phobos were facing the wrong way (they can't fire into the rear arc) and the Helios were out of range for reaction fire until after I shot.
I knew I would lose the Athena, that's 21 shots she would have to dodge on her way out! But on turn 5, in a game I was just barely winning, that's not such a big deal. Stranding a squad of Immortals for half the game during the Intel collection mission, Recon, is almost as good as killing them.
I did win that game 6 to 5. Had I not stranded those Immortals, I would have been in deep trouble. My excellent opponent, Devin (and his Nemesis-Hades-Hades list), collected 3 Intel that game. Two of them turned in to Objectives that he got off the board very quickly. Conversely, all 6 of my collections were just single VP Intel.

My Athena didn't perform spectacular feats of tactical destruction, but it did help strand a critical enemy unit for most of the game, earning me the win. That's the most important thing I've learned about my Fast Mover in the last three months: an FM can hit anywhere on the board, so if you can choose the right moment to strike, the right target to kill, it can win you the game even if it dies horribly. The trick is in knowing those moments and those targets.
To summarize...
- Early game: Low risk building demo (unless another low risk, but critical target presents itself). Don't throw your FM away on suicide runs this early!
- Mid game: Stray hunting. No one likes losing units! Put that psych pressure on and work toward narrowing your opponents options and winning that tie.
- Late game: Don't be afraid to sacrifice this unit to kill a critical target, like a commander or Objective carrier. But before you attack, be relatively certain you will score the kill. Otherwise, you're throwing away the unit and maybe snatching defeat from the jaws of victory by losing those Kill Points and subsequently, the tie.
<<< >>>

Boy are those some pretty models with lovely paint jobs! (I don't know anything about the game, but those are some nice photos!)
ReplyDeleteThanks, Greg! It takes me forever to paint anything, though. Great game! You should try it!
DeleteNice article, though I've had an Athena used aggressively to take out my gates. Supercruise is an amazing ability and the 6 shots the Athena has is enough to over come the penalty. Meanwhile, Shaltari AA needs 6s to hit and then 5s to damage. In this game it was targetting my Firedrake and eventually killed it. It would of went down had it not had some field repair, but it was still super effective and my Warspear's job was to shadow it. Sadly, I got that random bad luck, missing an intercept run that brought down the Firedrake. I don't begrudge the warspear however, it's the only place Shaltari get E7 AA.
ReplyDeletechrisloomis13
I'm not by any means saying it CAN'T be used aggressively, I've just found it more effective picking the time/place very carefully. It depends a lot on the AA coverage. I'll hit anything left unattended over a risky High Value Target, given the chance.
DeleteYou may have to bench that Warspear due to you missing that roll, BTW. ;)